At THERMOFORA, we run thermoforming machines daily in a production environment. When cosplay prop makers ask us how to get sharp pulls on helmets, clean visors, and consistent armor pieces batch after batch, the answer is always the same: it starts with understanding what a vacuum forming machine for cosplay actually needs to do, and then matching the machine to the job.
This guide covers everything that matters in practice: how the process works, which machine class fits your setup, what plastics to use and at what temperatures, how to build molds that release cleanly, and how to fix the defects that show up most often on the forming table.
How Vacuum Forming Actually Works
The process itself is simple. You heat a flat plastic sheet until it goes soft, clamp it over a mold, and pull the air out from underneath. Atmospheric pressure does the rest. The sheet wraps tightly around the mold geometry, cools, and holds that shape permanently.
What matters in practice is the timing. The sheet has a forming window: a temperature range where it is soft enough to stretch without tearing. If you move too slowly, the plastic cools before it makes full contact with the mold and you lose detail. If the sheet is too hot, it thins out over the high points and tears.
For cosplay, this process gives you three things that are hard to get any other way:
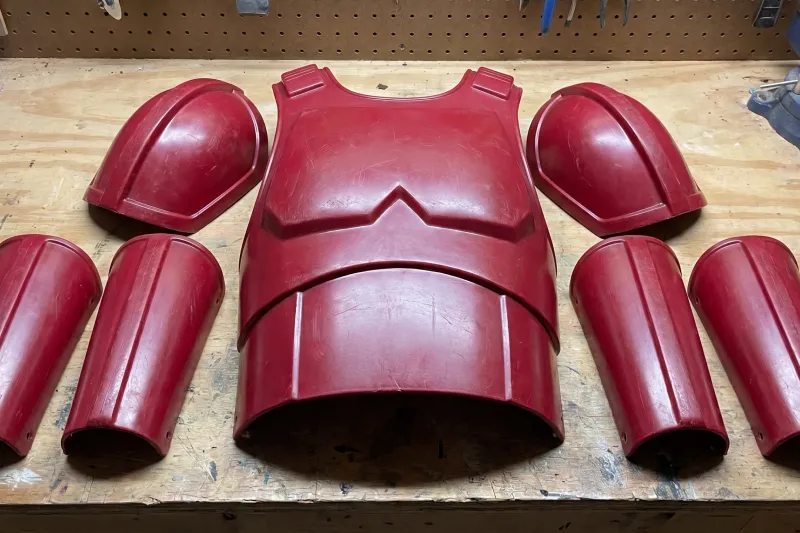
- Repeatability. Left and right gauntlets pulled from the same mold will be symmetrical every time. That matters when you are building matching armor sets or multiple copies of the same prop.
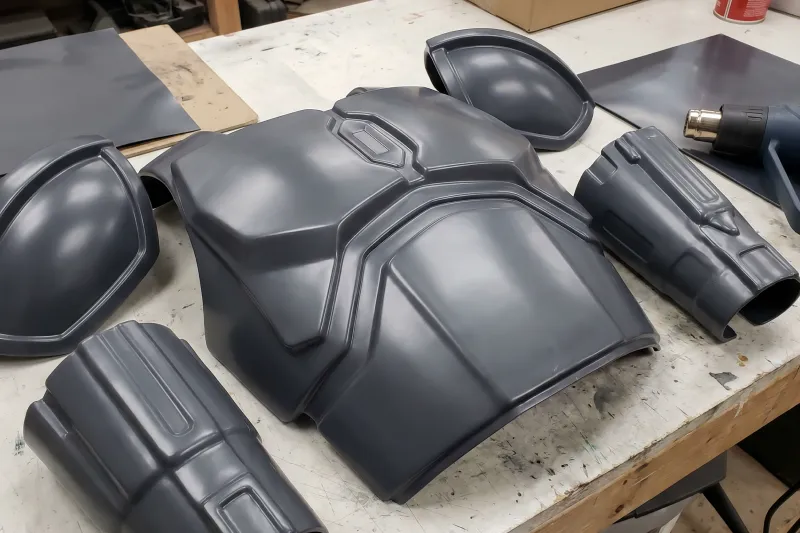
- Weight. A vacuum formed ABS chest plate is structurally solid and significantly lighter than fiberglass or resin. It survives convention wear without cracking.
- Surface quality. The plastic picks up the texture of your mold directly. A smooth mold gives a smooth part. A textured mold transfers that texture cleanly. Paint adhesion on vacuum formed parts is excellent.
Which Type of Machine Fits Your Build Style

There are three practical categories, and the differences between them matter.
DIY shop-vac setups
The heating source is a kitchen oven or heat gun. The vacuum is a household shop-vac pulling through a pegboard box. These setups work for thin sheets under 2 mm and simple shapes. The weak points are heating uniformity and vacuum depth: you get plenty of airflow but not enough pressure differential to pull crisp detail around tight corners or into deep recesses.
- Good for: small accessories, belt parts, flat emblems.
- Not suitable for: helmets, thick chest pieces, anything requiring sharp detail.
Desktop commercial machines
This is the category where most serious cosplay prop makers land. Well-built desktop units have zoned heaters, a proper vacuum pump, and a mechanical table lift. They handle sheets up to 4 mm, form beds around 450 x 450 mm, and produce consistent, repeatable results session after session.
- Good for: helmets, pauldrons, gauntlets, optical-grade visors, display parts.
Mid-size workshop machines
Forming beds from 600 x 600 mm up to 1000 x 1000 mm, pneumatic table lifts, rotary vane vacuum pumps with reservoir tanks. These are production tools. They handle thick sheets, deep draws, and batch runs without slowing down between cycles.
- Good for: full torso armor, large shields, studio-level prop production.
SMARTFORM 450 vs Formech 508DT: Compact Machine Comparison
If you are choosing between desktop machines, this comparison comes up often. Both work in the same forming bed size class and are aimed at serious prop makers and small studios.
The THERMOFORA Desktop Vacuum Forming Machine SMARTFORM 450 costs $5,000 as a ready-made machine. If you have access to a workshop, building from our drawings package brings the total materials cost down to around $2,000 — the package includes full CAD files, electrical schematics, and controller software. The Formech 508DT is a plug-and-play desktop unit priced at $7,500.
| Feature | SMARTFORM 450 (THERMOFORA) | Formech 508DT |
|---|---|---|
| Forming area | 450 x 450 mm | 482 x 432 mm |
| Max sheet thickness | 6 mm | 6 mm |
| Max draw depth | 200 mm | 185 mm |
| Heater type | Zoned quartz infrared | Zoned quartz infrared |
| Vacuum pump | Rotary vane 8 m3 /h | Rotary vane 4.9 m3 /h |
| Table lift | Manual | Manual |
| Controls | Delta PLC | Mitsubishi PLC |
| Price — ready-made | $5,000 USD | $7,500 USD |
| Materials cost if self-build | ~$2,000 USD | not available |
In practice both machines handle helmets, gauntlets, and thick ABS without issues. The key difference is the vacuum source: the SMARTFORM 450 uses a rotary vane pump which gives a faster pressure drop and sharper detail on deep draws compared to the diaphragm pump in the Formech 508DT. The Formech pump is quieter and requires no maintenance, but flow rate is lower. Both machines are significantly ahead of any DIY shop-vac setup in terms of detail reproduction and sheet thickness capability.
Choosing the Right Plastic for Cosplay
The plastic choice matters as much as the machine. Each material behaves differently on the forming table, and each one has a specific use case in cosplay.
ABS (Acrylonitrile Butadiene Styrene)
The standard material for heavy armor. ABS is impact-resistant, sands well, and accepts primer without issues. It comes in smooth or haircell texture finishes. Haircell gives you a surface that reads as mechanical or industrial, which works for most sci-fi armor types. I push toward 175 C for anything over 3 mm.
- Forming temperature: 150-180 C
- Best for: Stormtrooper armor, mechanical suits, pauldrons, anything that needs to survive physical contact.
HIPS (High Impact Polystyrene)
Cheaper than ABS and slightly more brittle, but it picks up mold detail extremely well. It forms at a lower temperature and is more forgiving for beginners. The brittleness matters at cut edges and drill points, so factor that into your finishing process.
- Forming temperature: 130-160 C
- Best for: Weapon shells, helmet faceplates, prop cores that will be painted and handled carefully.
PETG (Polyethylene Terephthalate Glycol)
Optically clear, tough, and much easier to form than acrylic. It does not shatter when you cut or drill it, which matters on visor finishing. PETG absorbs moisture from the air over time. If you store sheets in a humid space and form them without drying, you will get micro-bubbles trapped in the material. Pre-dry at 65 C for 4-6 hours before forming any PETG that has been sitting in storage.
- Forming temperature: 120-150 C
- Best for: Clear visors, glowing energy props, display windows.
Polycarbonate (PC / Lexan)
The strongest clear plastic available for cosplay use. Effectively indestructible at typical prop thicknesses. The trade-off is that it requires 180-210 C to form properly and needs a strong vacuum pull to get full detail. PC must be pre-dried before forming. Do not attempt it on a DIY setup or any machine without adequate vacuum depth.
- Best for: High-end builds where the visor or clear component will take significant impact.
| Material | Forming Temp | Key Strength | Common Cosplay Use |
|---|---|---|---|
| ABS | 150-180 C | Impact resistance, sandable | Heavy armor, pauldrons |
| HIPS | 130-160 C | Detail reproduction, low cost | Weapon shells, prototypes |
| PETG | 120-150 C | Optical clarity, toughness | Visors, clear props |
| PC | 180-210 C | Extreme durability | Premium visors |
Mold Design: What Makes Parts Release Cleanly
The machine pulls the plastic. The mold determines whether you can actually get the part off afterward. These are the rules we enforce on every mold that comes through the shop.
Draft angles
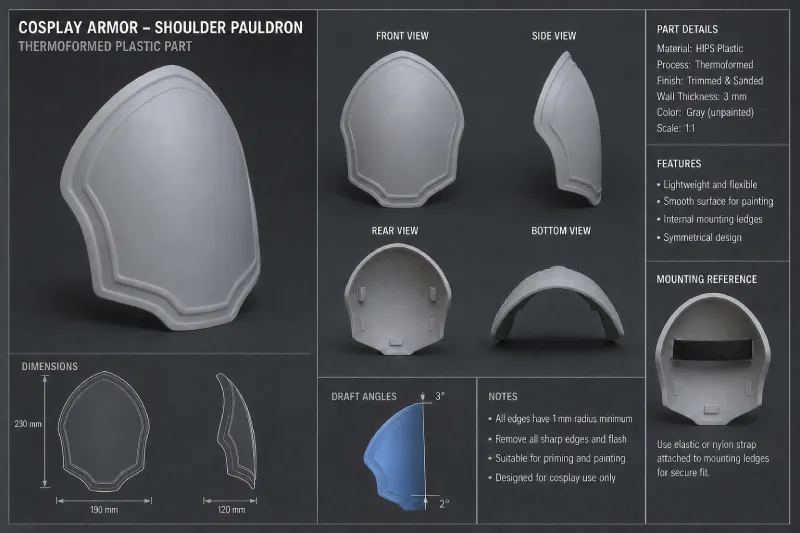
Never design a vertical wall. As ABS cools, it shrinks and grips the mold. On a positive (male) mold, any wall that runs at 90 degrees to the forming direction will lock the plastic in place. Minimum draft is 3 degrees on shallow features, 5 degrees on anything with more than 40 mm of depth. Without draft, you will damage the part removing it or destroy the mold getting the part free.
Vent holes
Vacuum cannot reach into a blind pocket on its own. Air trapped in a deep recess prevents the plastic from making contact with the mold surface. Drill 0.5-1.0 mm vent holes at the deepest point of every recess, pocket, and tight corner. The plastic pulls directly into the void instead of bridging across it.
Undercuts
An undercut is any geometry that traps the hardened plastic under a lip. If the mold has an undercut, the part cannot be removed without cutting the mold apart or damaging the pull. Design molds with this in mind from the start.
Mold materials
- 3D printed (PLA, PETG, ASA). Print at minimum 30% infill, gyroid pattern, with at least 4 perimeter walls. The vacuum load is significant and hollow prints collapse. Seal the surface with filler primer and sand smooth before forming.
- MDF / hardwood. Durable for long production runs. Seal thoroughly or the wood grain transfers to the plastic. Good for molds you will use dozens of times.
- Plaster / clay. Suitable for hand-sculpted organic shapes like creature armor. Fragile under repeated thermal cycling. Use as a master for casting a more durable working mold rather than forming directly.
Troubleshooting the Most Common Forming Defects
These are the defects that come up most often when people are learning on new molds or new materials.
1. Webbing
What you seeFolds or triangular webs of excess plastic bunching between high points on the mold.
Root causeThe mold elements are too close together relative to the sheet thickness, or the draw ratio is too high. The plastic runs out of material to cover the gap between molds without folding.
Fix- Slow the table lift speed. Giving the sheet more time to settle reduces webbing on tall molds.
- Lower the forming temperature by 5-10 C. A slightly cooler sheet stretches less aggressively.
- Add spacer blocks around mold bases to pull excess plastic away from the main geometry before the table rises fully.
2. Thinning and Tearing
What you seeThe plastic is paper-thin at the top corners of the mold, or it tears through completely.
Root causeThe sheet was overheated. When ABS goes past its forming window, it becomes fluid and stretches to almost nothing before the vacuum even engages.
Fix- Reduce heating time. On most desktop machines, pulling the sheet 5-10 seconds earlier is enough.
- Use a plug assist on deep draws: a shaped tool that pushes material down into the cavity mechanically before suction engages, pre-distributing the sheet and preventing corner thinning.
3. Soft or Missing Detail
What you seeThe plastic looks rounded and soft. Fine lines from the mold do not appear in the pull.
Root causeEither the vacuum depth is insufficient, the clamping frame is leaking, or the plastic cooled too much before the pump reached full depth.
Fix- Check gaskets for any gap or damage and replace if compressed flat.
- Add vent holes to the problem areas of the mold.
- On cold workshop days, pre-warm the mold slightly before forming to slow surface cooling.
FAQ
What plastic is best for vacuum forming cosplay armor?
ABS is the standard choice for structural armor pieces. It is impact-resistant, easy to sand and prime, and holds shape well over time. For visors and clear components, PETG is the practical choice: optically clear, tough enough to drill and cut without shattering, and much easier to form than polycarbonate.
What size vacuum forming machine do I need for helmets?
A forming bed of 400 x 400 mm is the practical minimum for most full-scale helmets. A 450 x 450 mm bed gives you more margin for positioning. Machines with beds smaller than 350 x 350 mm will struggle with anything larger than a half-helmet or a standard face mask.
Can I vacuum form thick ABS on a desktop machine?
Yes. On the SMARTFORM 450 we regularly form ABS up to 6 mm without issues — the rotary vane pump with reservoir tank gives enough vacuum depth, and the PID-controlled quartz heaters bring thick sheets to an even temperature throughout. On lower-spec desktop units with diaphragm pumps, 2 mm is the realistic limit before you start seeing cold spots and incomplete pulls.
Why does my vacuum formed part stick to the mold?
The most common causes are missing draft angles and insufficient venting. Walls without draft lock onto the mold as the plastic shrinks during cooling. Recesses without vent holes trap air that prevents clean release. Apply a thin coat of paste wax or mold release to the mold surface before each forming cycle.
How is vacuum forming different from buying pre-made cosplay armor?
Vacuum forming lets you produce custom-fit parts from scratch using your own molds. You control the geometry, the material, the finish, and the fit. Pre-made parts are built for average proportions and typically require significant modification. For screen-accurate builds or unusual body proportions, vacuum forming is faster and more precise once the molds are made.
Buy Vacuum Forming Machine
Build your vacuum forming machine from professional drawings
From desktop-size prototyping machines to full industrial-format setups. Full package: CAD drawings, electrical schematics, controller and HMI software. Our machines run in 24 countries.